
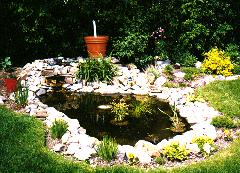
The filter is the "pot" in the back center.
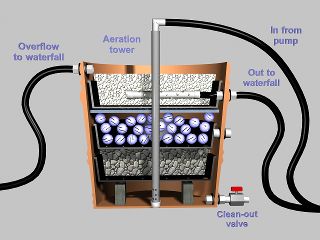
Shown at right are two different representations of cross-sections of
my filter. In this type of filter the inflow enters an aeration tube
where it is oxygenated as it falls to the bottom of the "pot".
1. A 20" diamter plastic, terra-cota looking flower pot (with no center drain hole).
2. Head to the hardware store to obtain the plumbing pieces. I really can't provide names for everthing I got, so just go to the store and poke around the PVC plumbing section.

For the coonections to the tubing, I bought sprinkler system couplers that are threaded on one end (to go into the PVC in-line splicers) and allow you to push the tubing on to the other end.
3. Feed supply store for 3 - heavy duty livestock or large dog dishes. This will take some clever testing on your part. You want one dish for each of the three "trays" shown above. Since the pot you will use is probably tapered, all three dishes will need to be slightly smaller than one another. Drill a bunch of 1/4 inches holes through the bottom of each tray.
4. One long section of 1" PVC with holes drilled near the bottom for the aeration tube (about 36" in length).
5. One short section of 1/2" PVC with holes drilled all along the length for the diffuser (about 12" in length) and attach an end cap to one end and a threaded sprinkler coupling to the other.
6. Silicon caulk to adhere a flat end-cap for the 1" PVC aeration tube to the bottom. Don't worry about how secure it is becasue the rest of the stuff you put in the pot will also help to hold it in place.
7. Place bricks in the bottom of the pot. Just add engough to support the first tray.
8. Cut a 1" hole in the center of the first tray so that it will slide over the aeration tube and rest on the bricks. Fill this tray with 1/2" diameter rounded gravel. In fact, dump gravel into the pot until it is about 1/3 full.
9. Cut a 1" hole in the center of the second tray and slide it over the aeration tube so that it rests on the gravel. Now go to the pet store and buy a whole bunch of "bio-balls". The folks that work there will know what they are. They have spines or cut outs so that the surface area of each ball is about a zillion times more than just a ball. You can also get them from "Pet Warehouse". A box of 74 balls is only $5.79. Here is where our little bacteria will start their community. Dump all of the bio-balls into tray #2.
10. I bought a circular filter mat from "Pet Warehouse". They are called "replacement filter pads" and are arounf $14.00. Cut a 1" hole in the cneter of this and slide it over the aeration tube so that is rests on the bio-balls.
11. Cut a 1" hole in the center of the third tray and slide it over the aeration tube so that is rests on the filter mat. Fill this tray to with pea-gravel.
12. Connect the diffuser, rest it on the pea-gravel and fill the pot up with pea-gravel until you are just about to the top. Be sure to be below the overflow hole shown on the diagram. Also, be sure to completely cover the diffuser.
Now its time to connect all of the tubing
1. Connect the line from the pump to the first "T", sprinkler connector. The straight through section goes on to the first in-line valve. Connect a line from the 90 degree end back into the pond. Since the flow through the filter will probably be less than your pump capacity, this allows you to regulate how much of the water from the pump is filtered. I filter as much as I can, about 75% of my pump capacity. Instead of going directly back into the pond, I let this line form the 90 degree end go around the filter and feed the upper waterfall along with the outflow from the filter.
2. The line from the valve goes into the top of the aeration tube. Here I used a 90 degree elbow and a threaded sprinker connector.
3. The line from the now burried diffuser and the filter overflow both go either back to the pond or to the upper waterfall. Just in case I need an adjustment to my flow control valve and I am gone, the overflow line helps to keep all of my water in the pond system and I don't accidently drain the whole thing!
4. The clean out valve lets me flush out all of the junk trapped by the filter without taking everything back out. To use, turn off the pump, open the valve and use the garden hose to flush water from the top of the filter out the clean out. If you want, you can capture the junk and use ot to fertilize non-consumable plants. DO NOT fertilize vegetables or anything you might want to eat!
5. Finally, just to get the whole thing going, I add a bunch of bacteria (about 1,000,000) that I buy from, yup, "Pet Warehouse". Remember, if you flush out the filter during your pond season, you may need to add more bacteria.